I had no idea alternators were so heavy. Dense little bastards, aren’t they?
Alternator change was mostly uneventful, except inconveniently placed — like everything else in this car. I followed this guide to get down in there. It was mostly uncovered during the timing belt work, but I really didn’t want to do the full disassembly, so the guide helped. While removing the vacuum reservoir tank (what the guide calls ‘the black canister’), I snapped a connector off the tank, which means that I had to replace the tank (8n0 131 541). Hooray plastic molding, and hooray Wolf Auto Parts.
Picked up a remanufactured alternator from Advance Auto Parts. Looks to be a rebuild in a Bosch housing. Everything lines up well and looks good, so we’ll see how long it lasts. I have the receipt if not. Bosch offers their own remanufactured units, but they don’t have any dealers in Minnesota, and don’t seem to sell online. Oh well. Out the door for under $130 for a nice looking, easily installed unit.
 |
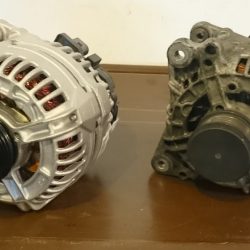
| New on the left, old on the right. Have a weird feeling that the old one was original. |
So, of course, this nice, new looking unit stands out a bit.
 |
| Shiny! |
The big issue was that it would have been far easier to do while I was doing everything else, but I’m glad I did the timing belt beforehand. Reattaching the accessory belt blind, without removing the sound dampener or putting the car on jack stands was doable, but far easier when I remembered where everything was. The other issue was getting enough clearance without taking everything out that I had already taken out before. Most people seem to take out a vacuum reservoir tank that sits next to the passenger side headlight. Easy enough to remove — disconnect the hose tangle on top, remove one 13mm bolt, remove a vacuum line, remove. Except while trying to remove the self-clamping vacuum line, I broke the plastic piece it attaches to clear off the tank.
 |
| Dammit. |
So, thanks Wolf Auto Parts for the quick delivery of a replacement tank. Pro tip – to remove this line, you can see the outline of a little button on the lip of this thing, about 1cm long, running along the lip. That has to be pushed in, and then the line can be removed safely and successfully. Save yourself the $35-$40 to replace the tank.
Needless to say, everything is a success. All my lights disappeared, and running voltage is perfect.
